Apache Pivot is a modern framework to create rich clients as desktop applications or to run in a web browser.
It offers nice GUI elements, supports XML/WTKX templates, data bindings, JVM scripting languages and much more.
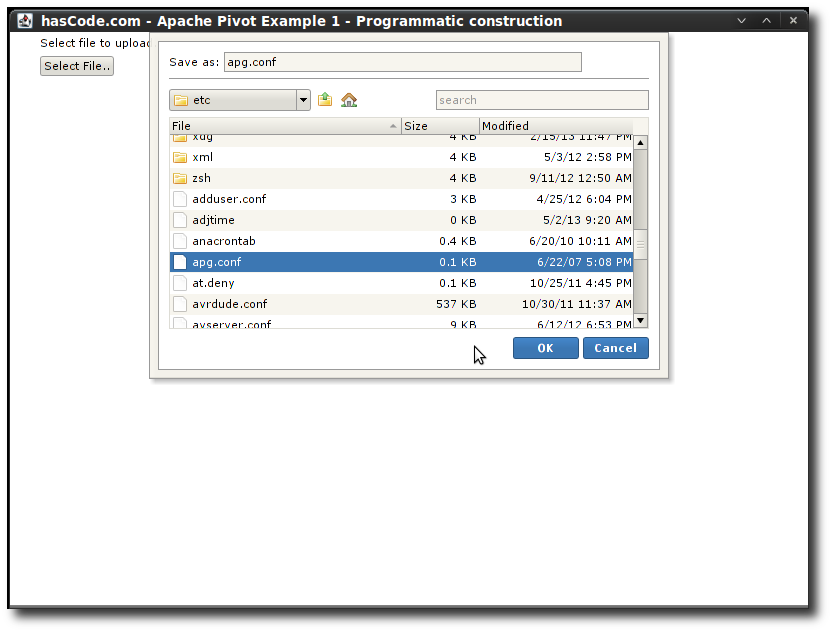
In the following short examples I’m going to create a desktop application to open a file browser, select a file and output the selected file’s name, first using a programmatic approach to create the user interface, and afterwards using XML/WTKX templates.
Dependencies
We need three dependencies for the following examples: pivot-core for the basic API, pivot-wtk for several GUI components and XML support and wtk-terra as our skin .. for the looks ;)
When charts are needed we might want to add pivot-charts in addition to the other dependencies.
Adding the following dependencies to our pom.xml should do the work for the following examples:
<properties>
	<pivot.version>2.0.2</pivot.version>
</properties>

<dependencies>
	<dependency>
		<groupId>org.apache.pivot</groupId>
		<artifactId>pivot-core</artifactId>
		<version>${pivot.version}</version>
	</dependency>
	<dependency>
		<groupId>org.apache.pivot</groupId>
		<artifactId>pivot-wtk</artifactId>
		<version>${pivot.version}</version>
	</dependency>
	<dependency>
		<groupId>org.apache.pivot</groupId>
		<artifactId>pivot-charts</artifactId>
		<version>${pivot.version}</version>
	</dependency>
	<dependency>
		<groupId>org.apache.pivot</groupId>
		<artifactId>pivot-wtk-terra</artifactId>
		<version>${pivot.version}</version>
	</dependency>
</dependencies>
Programmatic Style
In the first example we’re creating the application as if we were using swing .. creating elements and adding child components to their parent container in a programmatic style.
package com.hascode.tutorial.samples;

import java.io.File;

import org.apache.pivot.collections.ArrayList;
import org.apache.pivot.collections.Map;
import org.apache.pivot.collections.Sequence;
import org.apache.pivot.wtk.Alert;
import org.apache.pivot.wtk.Application;
import org.apache.pivot.wtk.Button;
import org.apache.pivot.wtk.ButtonPressListener;
import org.apache.pivot.wtk.DesktopApplicationContext;
import org.apache.pivot.wtk.Display;
import org.apache.pivot.wtk.FileBrowserSheet;
import org.apache.pivot.wtk.Form;
import org.apache.pivot.wtk.Label;
import org.apache.pivot.wtk.ListView;
import org.apache.pivot.wtk.MessageType;
import org.apache.pivot.wtk.PushButton;
import org.apache.pivot.wtk.Sheet;
import org.apache.pivot.wtk.SheetCloseListener;
import org.apache.pivot.wtk.Window;

public class Sample1 {
	public static void main(final String[] args) {
		DesktopApplicationContext.main(MyApp.class, args);
	}

	public static class MyApp extends Window implements Application {
		private final Form form = new Form();
		private final Form.Section section = new Form.Section();
		private final Label label = new Label("Select file to upload...");
		private final PushButton btOpenFileDialog = new PushButton();
		private final FileBrowserSheet fileBrowser = new FileBrowserSheet();

		public MyApp() {
			compose();
		}

		private void compose() {
			section.add(label);
			btOpenFileDialog.setButtonData("Select File..");
			section.add(btOpenFileDialog);
			form.getSections().add(section);
			fileBrowser.setMode(FileBrowserSheet.Mode.SAVE_AS);
			btOpenFileDialog.getButtonPressListeners().add(
					fileDialogDisplayListener);
			this.setContent(form);
			this.setTitle("hasCode.com - Apache Pivot Example 1 - Programmatic construction");
			this.setMaximized(true);
		}

		private final ButtonPressListener fileDialogDisplayListener = new ButtonPressListener() {
			@Override
			public void buttonPressed(final Button button) {
				fileBrowser.open(MyApp.this, new SheetCloseListener() {
					@Override
					public void sheetClosed(final Sheet sheet) {
						if (sheet.getResult()) {
							Sequence<File> selectedFiles = fileBrowser
									.getSelectedFiles();

							ListView listView = new ListView();
							listView.setListData(new ArrayList<File>(
									selectedFiles));
							listView.setSelectMode(ListView.SelectMode.NONE);
							listView.getStyles().put("backgroundColor", null);

							Alert.alert(MessageType.INFO,
									"Files selected for upload:", listView,
									MyApp.this);
						} else {
							Alert.alert(MessageType.INFO,
									"No files selected for upload.", MyApp.this);
						}
					}
				});
			}
		};

		@Override
		public void startup(final Display display,
				final Map<String, String> properties) throws Exception {
			this.open(display);
		}

		@Override
		public boolean shutdown(final boolean optional) throws Exception {
			this.close();
			return false;
		}

		@Override
		public void suspend() throws Exception {
		}

		@Override
		public void resume() throws Exception {
		}
	}
}
Running the application should allow to select files from the filesystem and display an alert with the select file’s name.


Layout using XML Templates
Now we want to create the same application but using XML/WTKX templates to specify the user interface.
This is the template that we’ve put in a file named filemanager.bxml in src/main/resources
<myApp:Sample2.MyApp title="hasCode.com - Apache Pivot Example 2 - BXML Template" maximized="true"
  xmlns:bxml="http://pivot.apache.org/bxml"
  xmlns:myApp="com.hascode.tutorial.samples"
  xmlns="org.apache.pivot.wtk">
  <Form>
  <Form.Section>
	<Label text="Select file to upload..."/>
	<PushButton bxml:id="btOpenFileDialog" buttonData="Select File.."/>
	</Form.Section>
	</Form>
</myApp:Sample2.MyApp>
So what’s special here? First of all, we’re binding the root element to our application class .. as we’re used from other ui binder frameworks in general each attribute for an element refers to a setter in the corresponding java class.
An example:
-
xmlns:myApp maps the xml namespace to our java package com.hascode.tutorial.samples
-
This allows us to create the XML root element and reference our application class Sample2.MyApp in this java package
-
MyApp extends org.apache.wtk.Window .. so for example the title attribute in the xml element triggers the setTitle() method for Window
-
We’ve added an attribute bxml:id to the push button. This allows us to reference this element in our java code
This is the full application:
package com.hascode.tutorial.samples;

import java.io.File;
import java.net.URL;

import org.apache.pivot.beans.BXML;
import org.apache.pivot.beans.BXMLSerializer;
import org.apache.pivot.beans.Bindable;
import org.apache.pivot.collections.ArrayList;
import org.apache.pivot.collections.Map;
import org.apache.pivot.collections.Sequence;
import org.apache.pivot.util.Resources;
import org.apache.pivot.wtk.Alert;
import org.apache.pivot.wtk.Application;
import org.apache.pivot.wtk.Button;
import org.apache.pivot.wtk.ButtonPressListener;
import org.apache.pivot.wtk.DesktopApplicationContext;
import org.apache.pivot.wtk.Display;
import org.apache.pivot.wtk.FileBrowserSheet;
import org.apache.pivot.wtk.ListView;
import org.apache.pivot.wtk.MessageType;
import org.apache.pivot.wtk.PushButton;
import org.apache.pivot.wtk.Sheet;
import org.apache.pivot.wtk.SheetCloseListener;
import org.apache.pivot.wtk.Window;

public class Sample2 {
	public static void main(final String[] args) {
		DesktopApplicationContext.main(MyApp.class, args);
	}

	public static class MyApp extends Window implements Application, Bindable {
		private Window window = null;

		@BXML
		private PushButton btOpenFileDialog;

		private final FileBrowserSheet fileBrowser;

		public MyApp() {
			fileBrowser = new FileBrowserSheet();
		}

		@Override
		public void initialize(final Map<String, Object> namespace,
				final URL location, final Resources resources) {
			fileBrowser.setMode(FileBrowserSheet.Mode.SAVE_AS);
			btOpenFileDialog.getButtonPressListeners().add(
					fileDialogDisplayListener);
		}

		@Override
		public void startup(final Display display,
				final Map<String, String> properties) throws Exception {
			BXMLSerializer bxmlSerializer = new BXMLSerializer();
			window = (Window) bxmlSerializer.readObject(Sample2.class,
					"/filemanager.bxml");
			window.open(display);
		}

		private final ButtonPressListener fileDialogDisplayListener = new ButtonPressListener() {
			@Override
			public void buttonPressed(final Button button) {
				fileBrowser.open(MyApp.this, new SheetCloseListener() {
					@Override
					public void sheetClosed(final Sheet sheet) {
						if (sheet.getResult()) {
							Sequence<File> selectedFiles = fileBrowser
									.getSelectedFiles();

							ListView listView = new ListView();
							listView.setListData(new ArrayList<File>(
									selectedFiles));
							listView.setSelectMode(ListView.SelectMode.NONE);
							listView.getStyles().put("backgroundColor", null);

							Alert.alert(MessageType.INFO,
									"Files selected for upload:", listView,
									MyApp.this);
						} else {
							Alert.alert(MessageType.INFO,
									"No files selected for upload.", MyApp.this);
						}
					}
				});
			}
		};

		@Override
		public boolean shutdown(final boolean optional) throws Exception {
			this.close();
			return false;
		}

		@Override
		public void suspend() throws Exception {
		}

		@Override
		public void resume() throws Exception {
		}
	}
}
Two interesting things here:
-
The BXMLSerializer allows us to bind xml template and java class:
BXMLSerializer bxmlSerializer = new BXMLSerializer(); window = (Window) bxmlSerializer.readObject(Sample2.class, "/filemanager.bxml"); -
The @BXML annotation allows us to reference elements from the xml layout either by field name or by explicitly specifying an identifier:
@BXML
private PushButton btOpenFileDialog;
Running this application should produce an identical output compared to the first example:

Tutorial Sources
Please feel free to download the tutorial sources from my GitHub repository, fork it there or clone it using Git:
git clone https://github.com/hascode/apache-pivot-tutorial.git