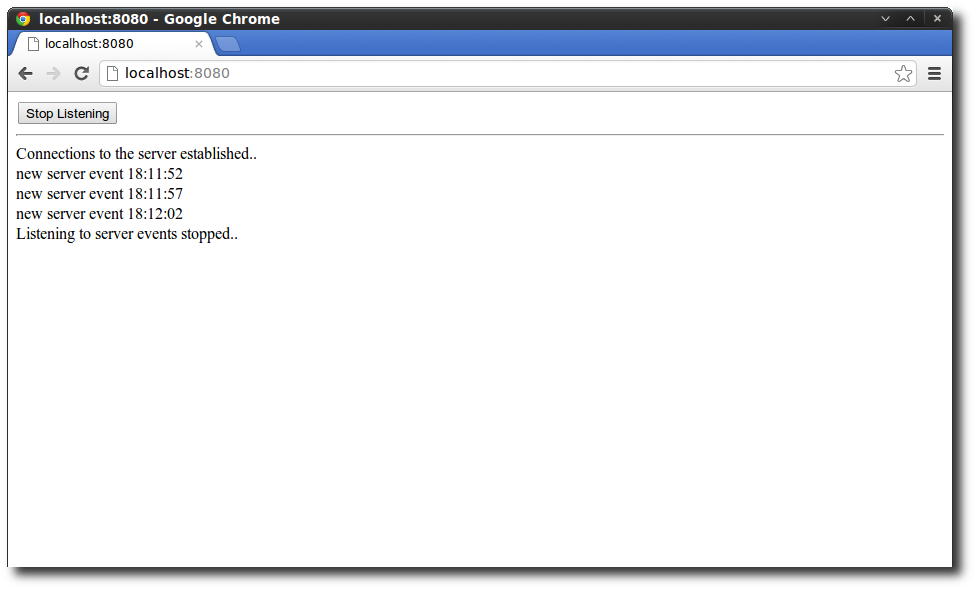
The HTML5 working draft describes different techniques to push information from a server to the client and the one described in this tutorial are Server-Send Events (SSE).
Using Server-Send-Events eliminates the need to poll a server periodically for information using AJAX and is really easy to implement because of the simple specification and the fact that nearly all modern browsers already implement this specification.
The Client Side
Registering for Server Send Events (SSE) is quite easy .. simply create a new EventSource object that is bound to the URL where the events are propagated.
In the next step just add an event listener to the source object – the function is called each time that a SSE is received.
Finally an event is bound to a button to stop listening to SSEs using the EventSource’s close method.
For the full specification I’d recommend to take a look at the W3C Working Draft or Eric Bidelman’s excellent tutorial.
<!DOCTYPE html>
<html>
<head>
<meta charset="utf-8" />
</head>
<body>
 <input type="button" id="stopButton" value="Stop Listening"/>
 <hr/>
 <div id="content"></div>
 <script>
 var source = new EventSource('/talk');
 source.addEventListener('open', function(e) {
 document.getElementById('content').innerHTML += 'Connections to the server established..<br/>';
 }, false);
 source.onmessage = function(e) {
 document.getElementById('content').innerHTML += e.data + '<br/>';
 };
 document.getElementById('stopButton').onclick=function(){
 document.getElementById('content').innerHTML += 'Listening to server events stopped..<br/>';
 source.close();
 }
 </script>
</body>
</html>
The Server Implementation
Now that we’ve covered the client side we’re in need of a server that propagates events periodically to the client.
I have added two example implementations here – one that is programmed in javascript to be run with node.js and another implementation as classical java servlet using Jetty as web container.
Using Node.js
To run the demo application using node.js simply run the following command from the project’s root directory:
node server.jsHere is the server implementation in Javascript:
var http = require('http');
var fs = require('fs');

/*
 * send interval in millis
 */
var sendInterval = 5000;

function sendServerSendEvent(req, res) {
 res.writeHead(200, {
 'Content-Type' : 'text/event-stream',
 'Cache-Control' : 'no-cache',
 'Connection' : 'keep-alive'
 });

 var sseId = (new Date()).toLocaleTimeString();

 setInterval(function() {
 writeServerSendEvent(res, sseId, (new Date()).toLocaleTimeString());
 }, sendInterval);

 writeServerSendEvent(res, sseId, (new Date()).toLocaleTimeString());
}

function writeServerSendEvent(res, sseId, data) {
 res.write('id: ' + sseId + '\n');
 res.write("data: new server event " + data + '\n\n');
}

http.createServer(function(req, res) {
 if (req.headers.accept && req.headers.accept == 'text/event-stream') {
 if (req.url == '/talk') {
 sendServerSendEvent(req, res);
 } else {
 res.writeHead(404);
 res.end();
 }
 } else {
 res.writeHead(200, {
 'Content-Type' : 'text/html'
 });
 res.write(fs.readFileSync(__dirname + '/index.html'));
 res.end();
 }
}).listen(8080);
Afterwards you should be able to open http://localhost:8080 in your browser and watch the events. Pressing the button should stop listening to the server send events.

Using Jetty
I am lazy that’s why I have used the Jetty EventSourceServlet (to be found in this GitHub project) so I don’t have to implement the HTTP states, content type negotiation etc ..
That is what my quick solution looks like:
package com.hascode.tutorial;

import java.io.IOException;
import java.util.Date;

import javax.servlet.annotation.WebInitParam;
import javax.servlet.annotation.WebServlet;
import javax.servlet.http.HttpServletRequest;

import org.eclipse.jetty.servlets.EventSource;
import org.eclipse.jetty.servlets.EventSourceServlet;

@WebServlet(urlPatterns = "/talk", initParams = { @WebInitParam(name = "heartBeatPeriod", value = "5") }, asyncSupported = true)
public class MySSEServlet extends EventSourceServlet {
 private static final long serialVersionUID = 1L;

 @Override
 protected EventSource newEventSource(final HttpServletRequest req) {
 return new EventSource() {

 @Override
 public void onOpen(final Emitter emitter) throws IOException {
 emitter.data("new server event " + new Date().toString());
 while (true) {
 System.out.println("propagating event..");
 try {
 Thread.sleep(5000);
 emitter.data("new server event "
 + new Date().toString());
 } catch (InterruptedException e) {
 e.printStackTrace();
 }
 }
 }

 @Override
 public void onClose() {
 System.out.println("closed");
 }
 };
 }
}
For convenience, I have added the following web.xml to load the index.html as start page:
<?xml version="1.0" encoding="ISO-8859-1"?>
<!DOCTYPE web-app
 PUBLIC "-//Sun Microsystems, Inc.//DTD Web Application 2.3//EN"
 "http://java.sun.com/dtd/web-app_2_3.dtd">
<web-app>
 <welcome-file-list>
 <welcome-file>index.html</welcome-file>
 </welcome-file-list>
</web-app>
To start the server instance simply run the following command:
mvn jetty:runAfterwards you should be able to see a similar result in your browser when pointing it to http://localhost:8080

Tutorial Sources
Please feel free to download the tutorial sources from my GitHub repository, fork it there or clone it using Mercurial:
git clone https://github.com/hascode/html5-server-send-events.gitResources
Article Updates
-
2018-06-01: Embedded YouTube video removed (GDPR/DSGVO).
